

Setup
 Click to enlarge
Step 1.1
P & I Gains - Setup Betaflight
 Click to enlarge
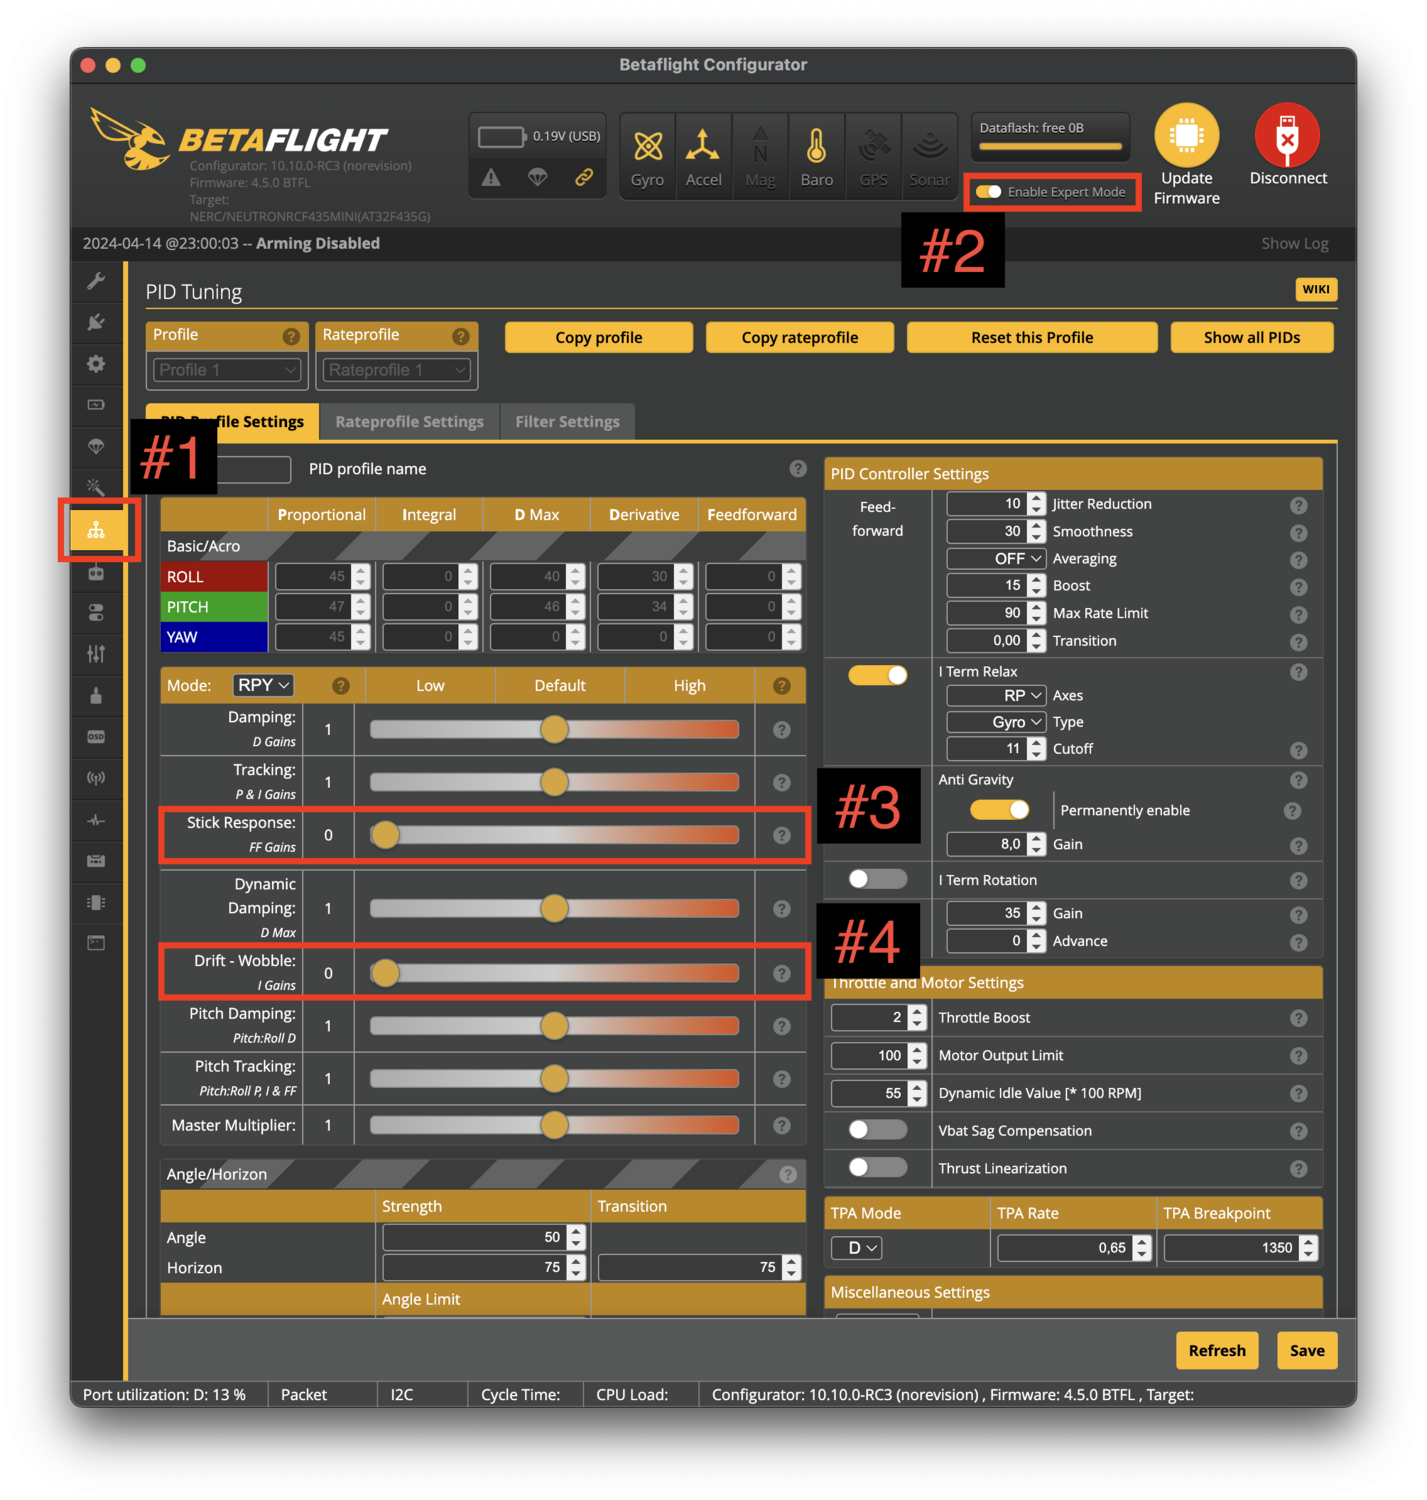
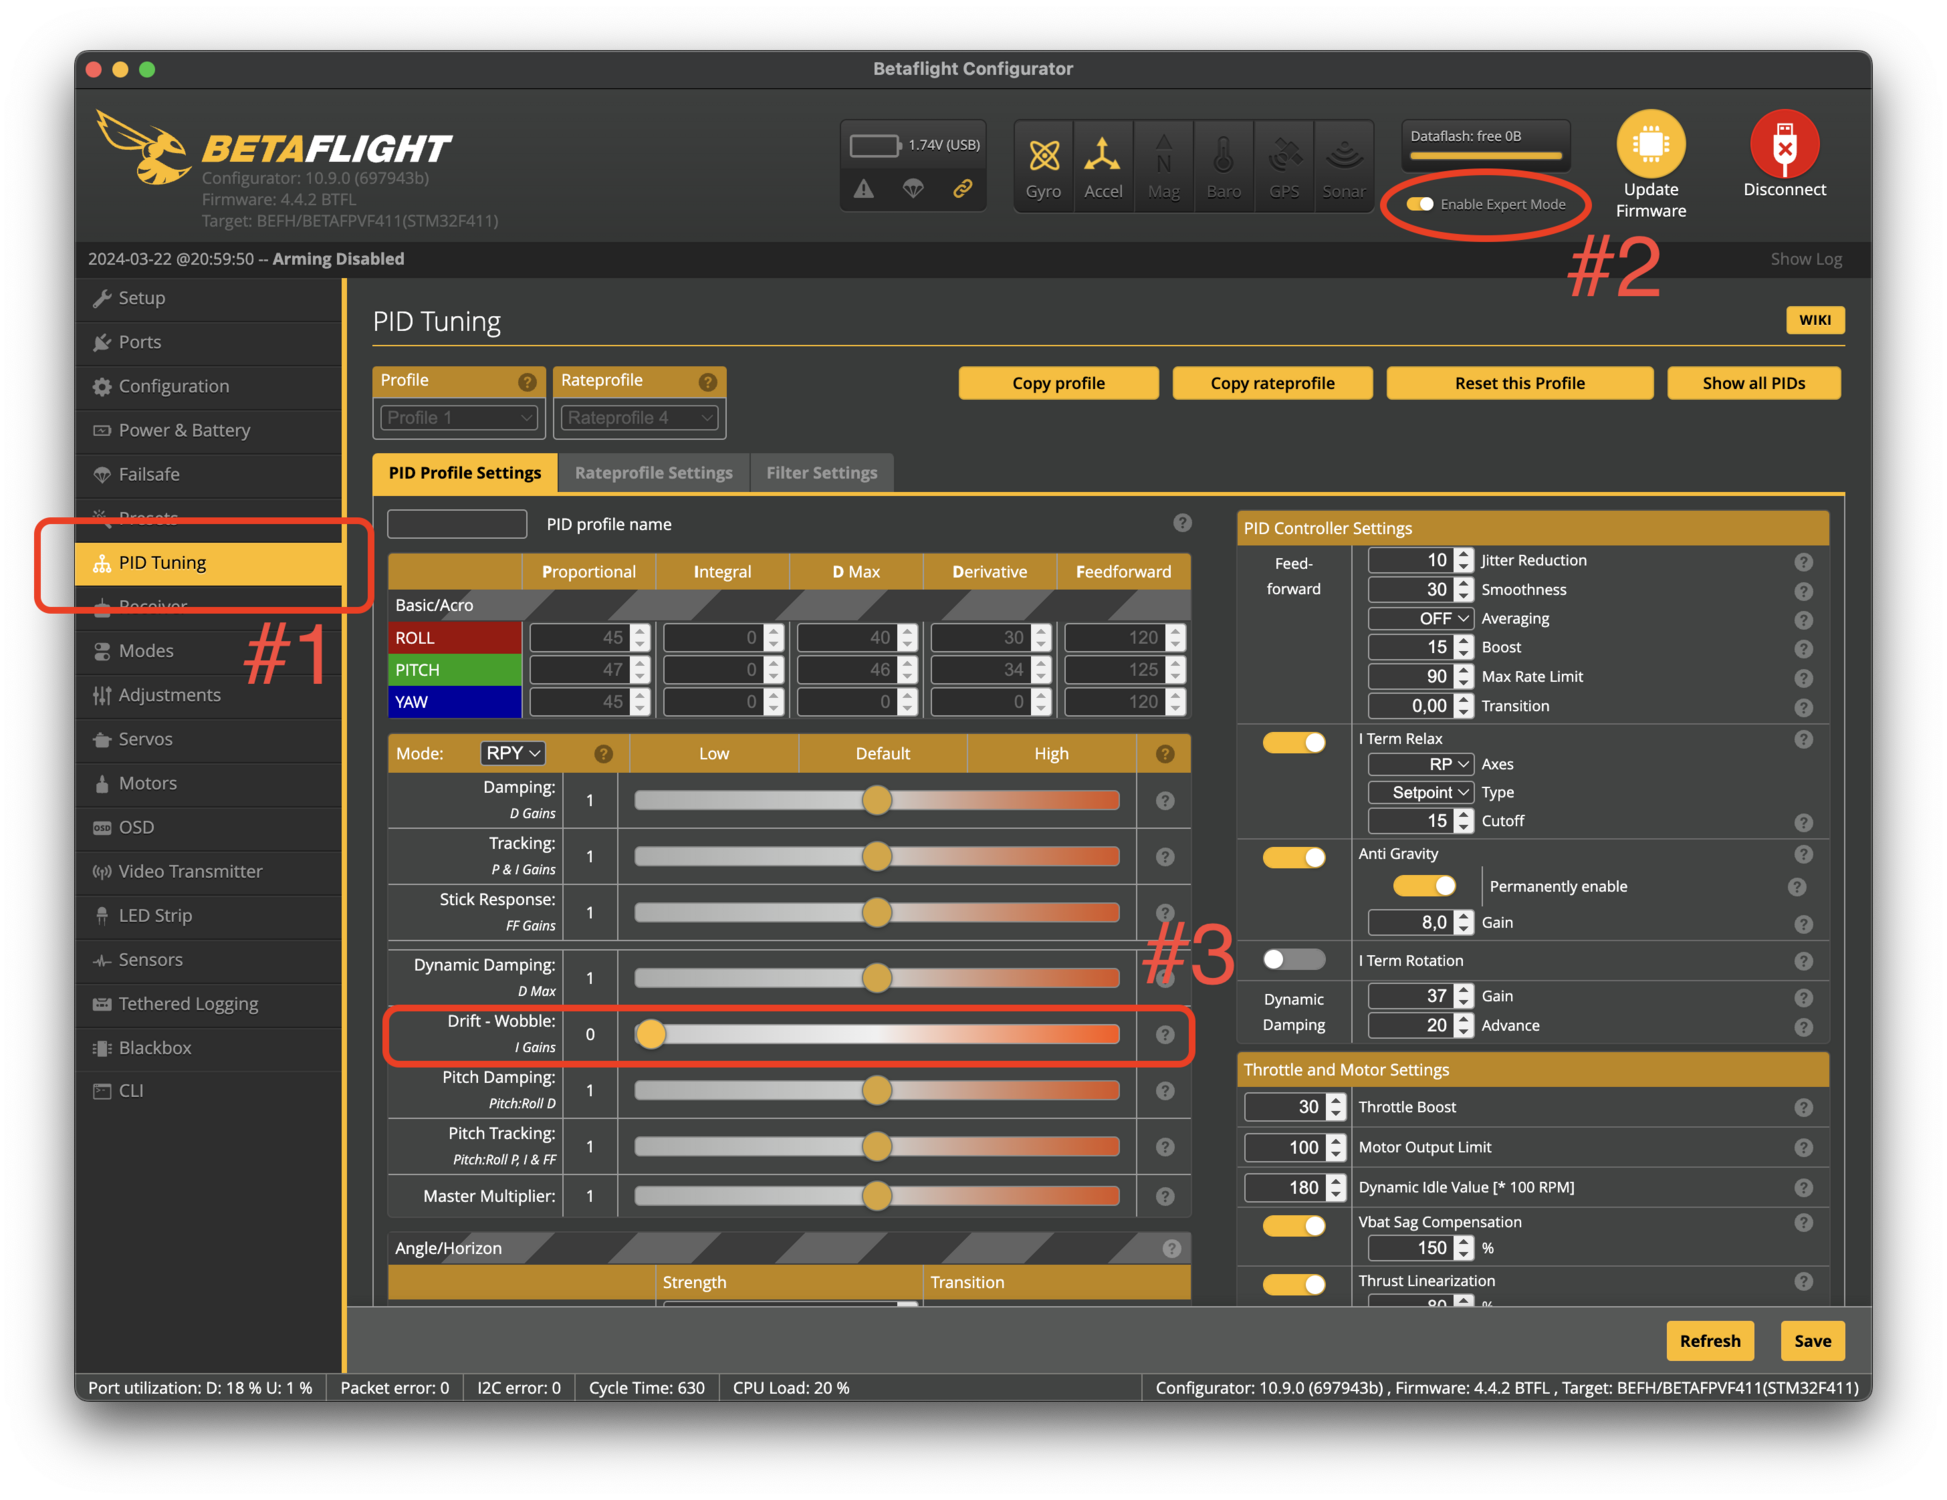
Connect your quad to Betaflight and go into the PID Tuning tab (#1).
Enable Expert Mode in the top right of the Configurator (#2)
Move the "Drift / Wobble" (I Gain) Slider down to 0 (#3)
Move the "Stick Response - FF Gains" Slider (#4) to 0
Hit "Save"
Step 1.2
P & I Gains - Log flights
 Click to enlarge
Now it's time to do some flights.
You may fly in ANGLE or ACRO mode, it doesn't matter.
The idea is to take a flight, then move the P & I Gains Slider ("Tracking") a step further up, and repeat until you hit the maximum slider position.
We suggest to move it by 0.2.
Fly for ~20 seconds every time.
Do quick roll and pitch movements (left, right, forward, backward)
It is way easier to change the slider value directly in the Betaflight FPV Goggle OSD than connecting your drone to your computer after each flight.
Just open up the OSD stick menu, navigate to profile > simplified tuning > PI Gains (this is the same as the "Tracking Slider")
Step 1.3
Extract Logfile
 Click to enlarge
For the next step we will need access to the generated log file.
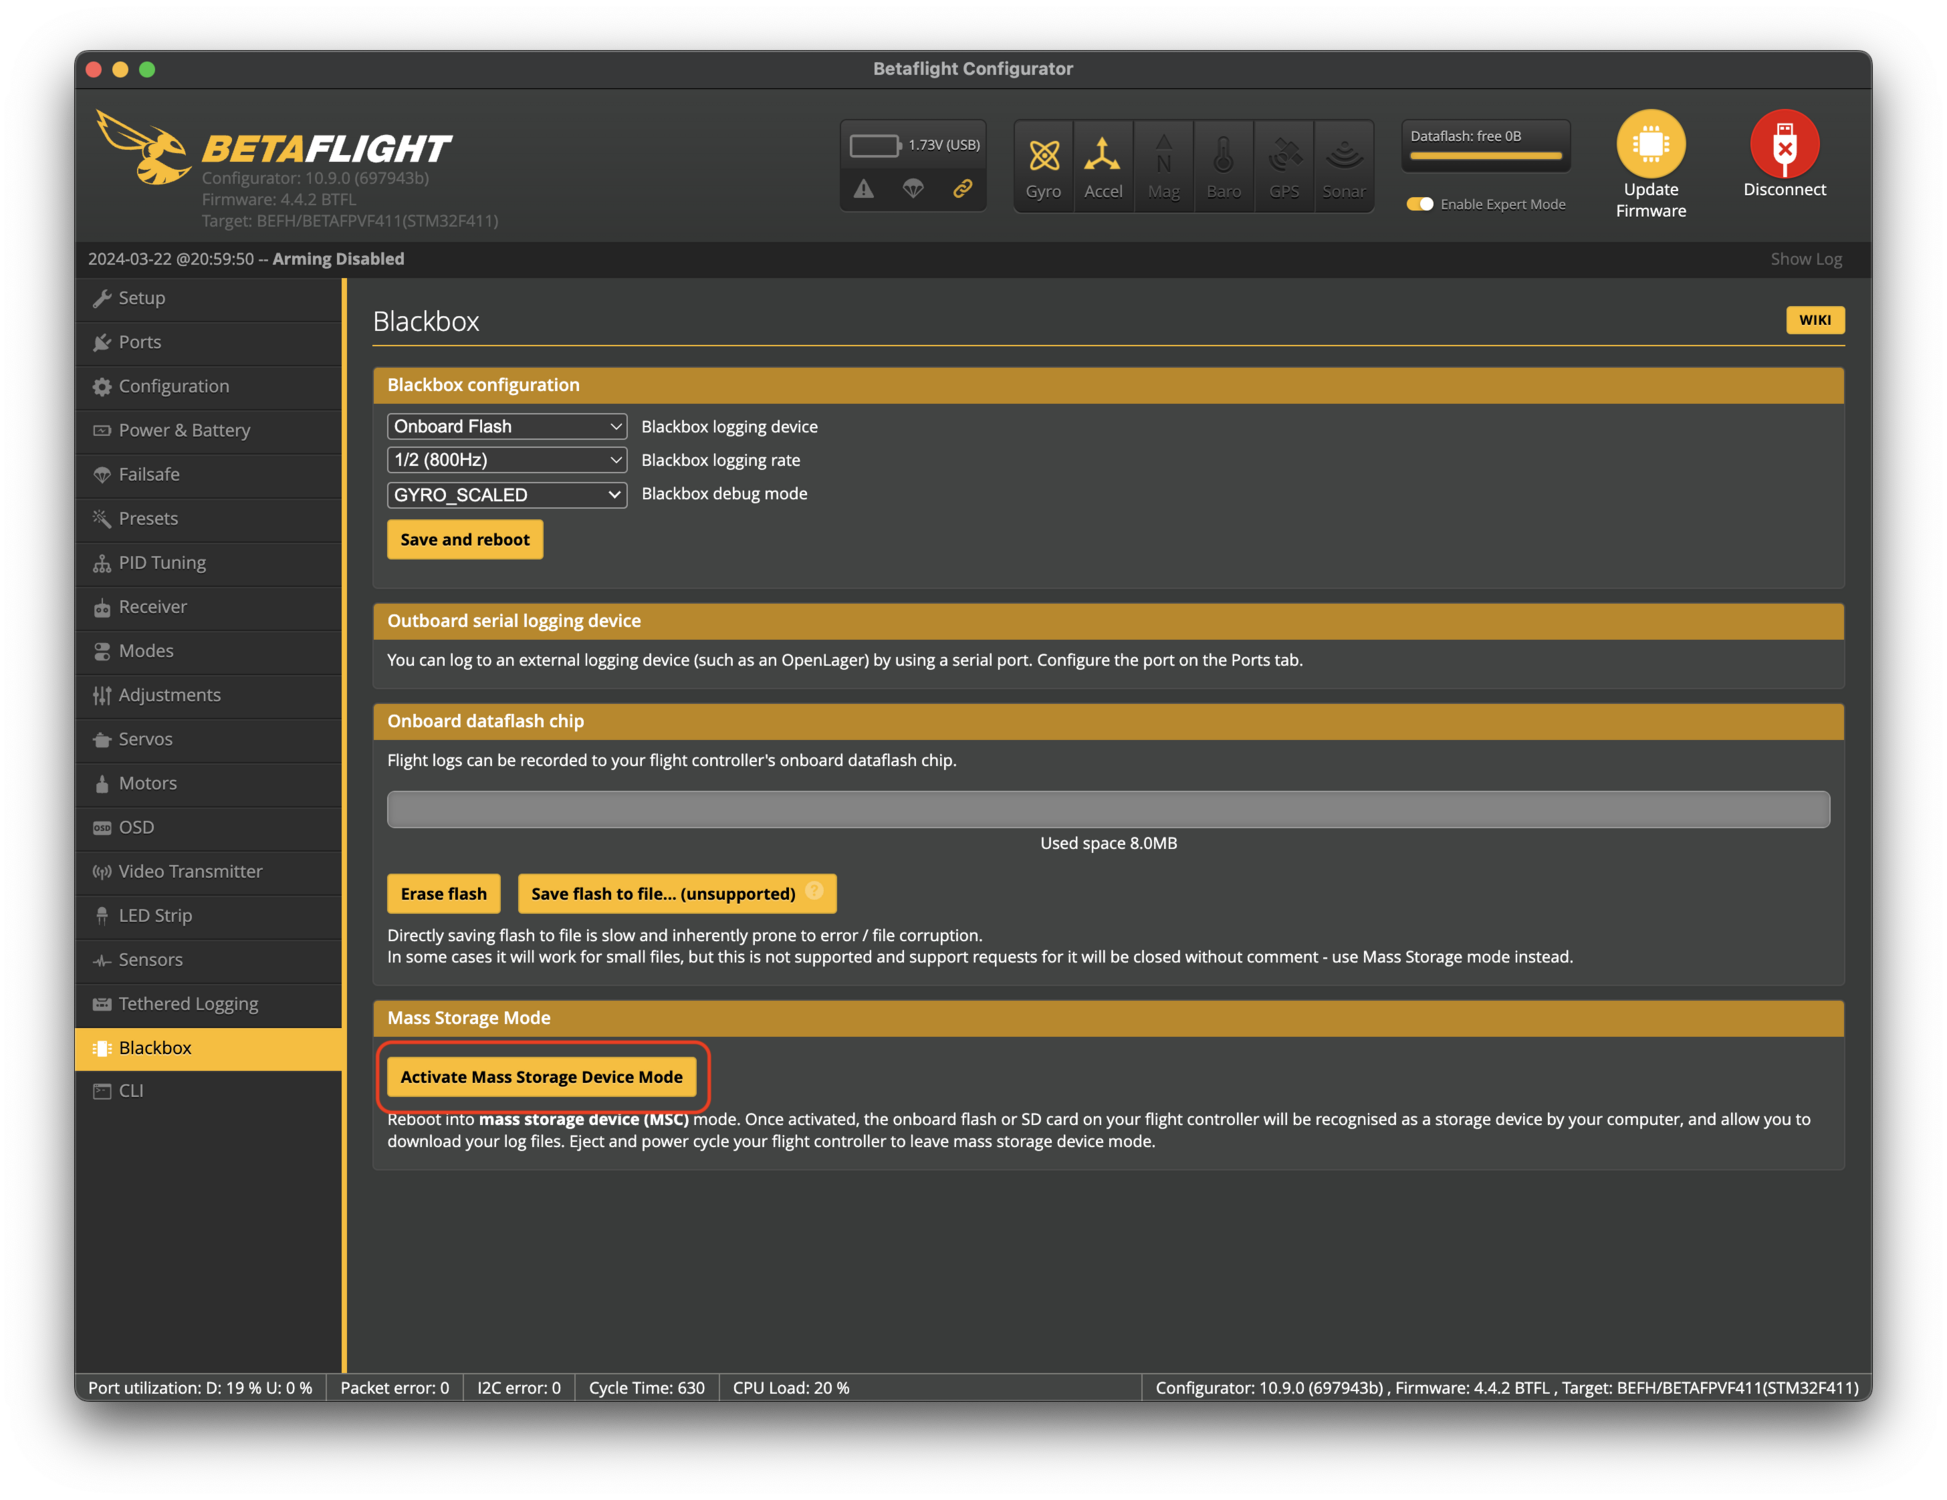
Connect your drone to the betaflight configurator, open the "Blackbox" tab and click on "Activate Mass Storage Device Mode".
A new USB storage device will connect / appear on your computer (like a USB stick)
Open that device on your computer (like a USB stick) and find a file called "btfl_all.bbl"
Copy this to your computer.
Step 1.4
P & I Gains - Analysis
 Click to enlarge
Let's run your flight logs through the analyzer and find out which slider values resulted in the best response.
The goal is to find the flight / response curve that gets the fastest and closest to a value of 1, without overshooting and without too much "waving" around a value of 1.
See the example Animation attached to this step for an example analysis.
We want to achieve that our quad responds quickly (quick move from bottom to the center line) and precisely (no overshoot / wobbles) without the need to correct itself afterwards.
Upload your "btfl_all.bbl" file into the analyzer (big button below) and compare the flights (you can toggle visibility of each flight line in the plot by clicking its label in the legend on top of the plot)
Find the flight that is closest to the desired state.
Set your P & I gains Slider to the value which was used during that flight and hit save (you can find the value in the legend/label of the plot)
You successfully tuned your P & I gains.
In order to use the Tuning Tools Analyzer, you need to download and cache the actual analyzer. The files are about 150 MB in size, if you are currently on a limited data plan, please be aware of this.
Step 2.1
Clear Blackbox
Let's start with a fresh blackbox so we are sure there is enough space left and also we don't need to filter out any previous flights from the upcoming analysis.
Please clear your blackbox flash memory now.
Step 2.2
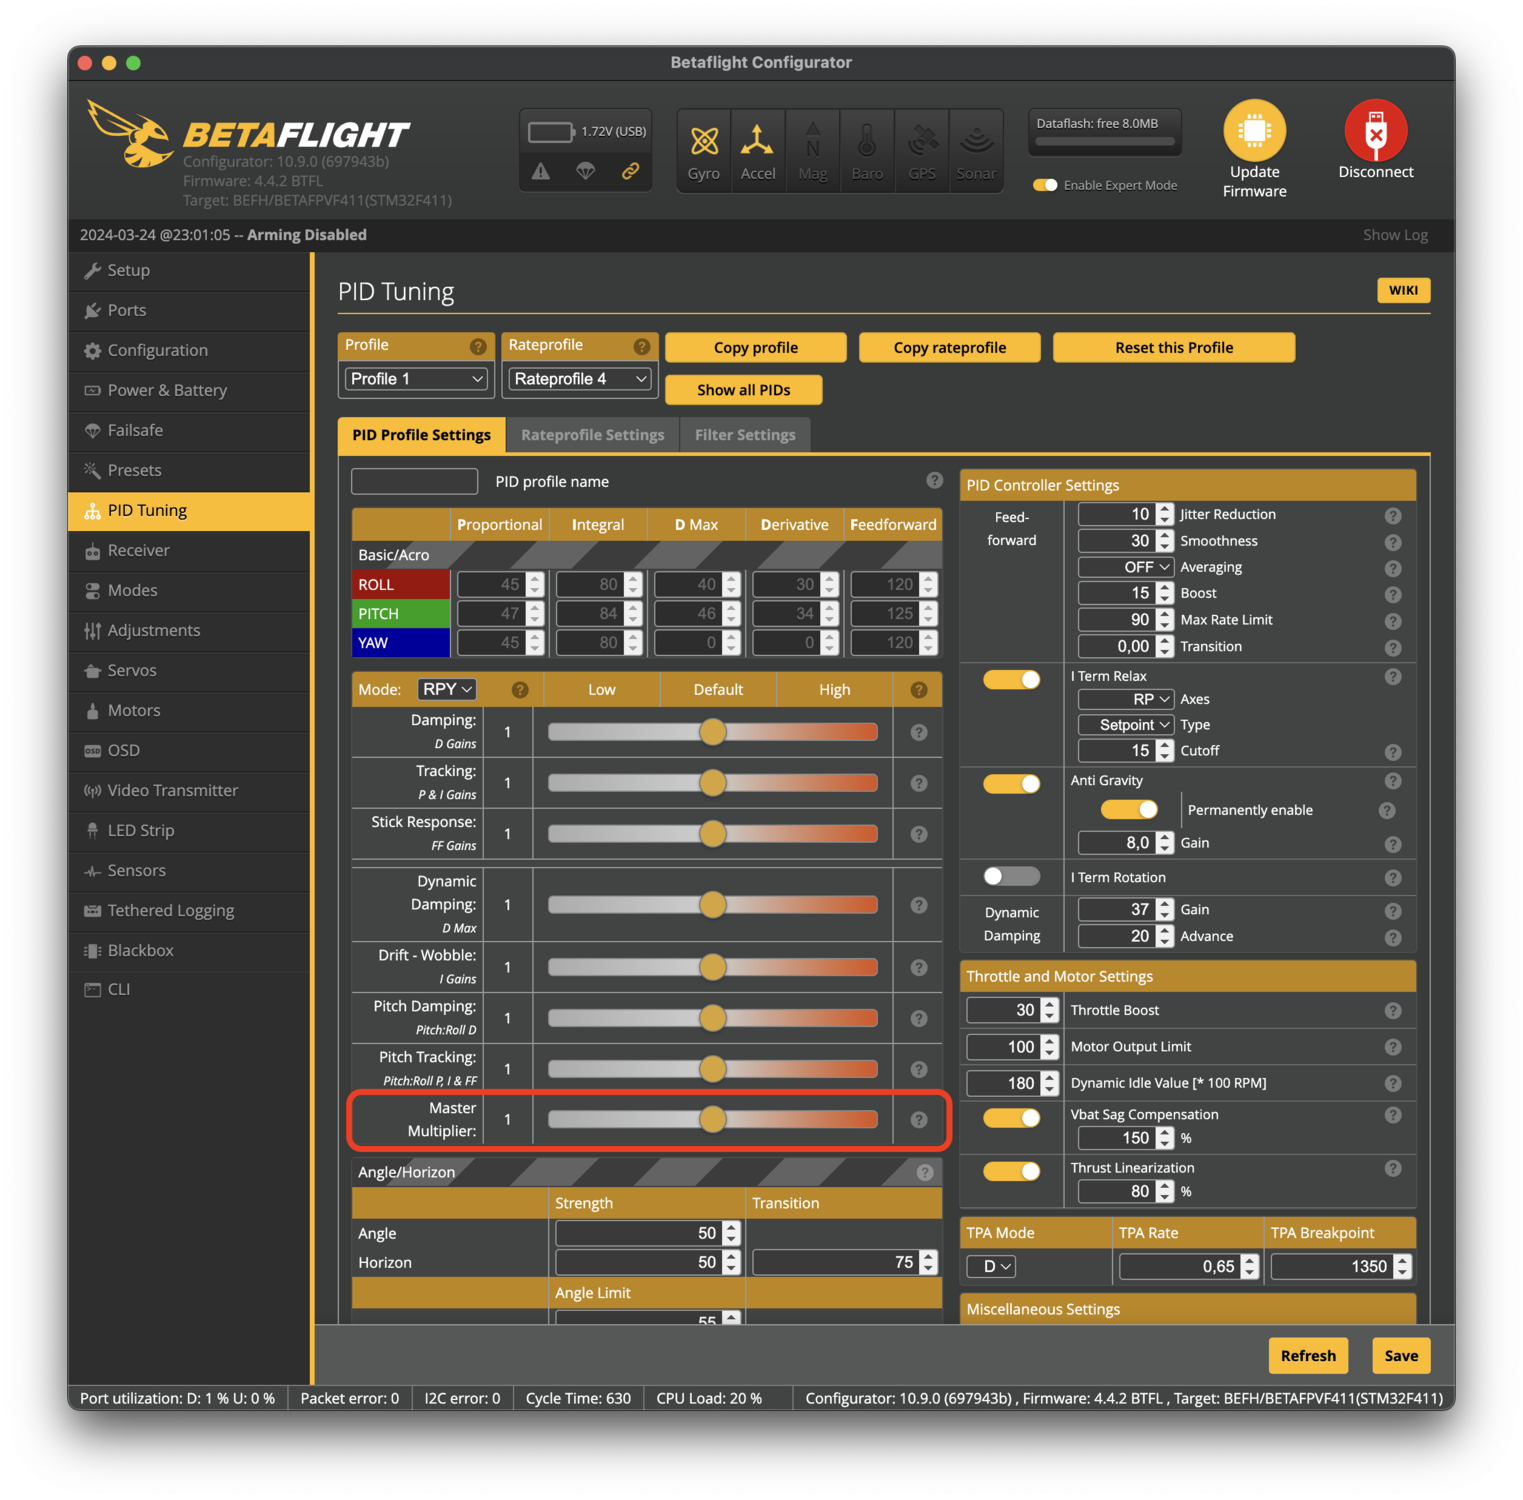
Master Slider - Log flights
 Click to enlarge
Now its time to do some flights.
The idea is to take a flight, then move the Master Multiplier slider a step further up, and repeat until you hit the maximum slider position.
We suggest to move it by 0.2.
Fly for ~20 seconds every time.
Do quick roll and pitch movements (left, right, forward, backward)
If you are tuning a small quad, you might end up with increasing your Master Multiplier to the maximum of 2.0, however, there still may be potential for improvement (e.g. your Step Response Curve is not yet close enough to being perfect AND YOUR MOTORS DO NOT RUN HOT).
In this case you can double your current "D Gain" slider value, as well as double your current "P & I Gain" slider value and then move your Master Multiplier back to 1.0.
Now you can continue increasing your Master Multiplier.
Step 2.3
Extract Logfile
Click to enlargeFor the next step we will need access to the generated log file.
Connect your drone to the betaflight configurator, open the "Blackbox" tab and click on "Activate Mass Storage Device Mode".
A new USB storage device will connect / appear on your computer (like a USB stick)
Open that device on your computer (like a USB stick) and find a file called "btfl_all.bbl"
Copy this to your computer.
Step 2.4
Master Slider - Analysis
 Click to enlarge
Now carry out the same analysis here as in step 1.4 “P & I Gain - Analysis”, with the difference that you adjust the main multiplier at the end and not the “P & I Gain” slider.
In order to use the Tuning Tools Analyzer, you need to download and cache the actual analyzer. The files are about 150 MB in size, if you are currently on a limited data plan, please be aware of this.
Step 3.1
I Gain- Setup Betaflight
 Click to enlarge
We don't really need to tune the I Gain, instead, we just need to return it to the default from Betaflight.
Connect your drone to Betaflight and go into the PID tuning tab (#1).
Enable expert mode in the top right of the configurator (#2)
Move the "Drift / Wobble" (I Gain) slider back to 1.0 (#3)
Hit "Save"
Step 3.2
Clear Blackbox
Let's start with a fresh blackbox so we are sure there is enough space left and also we don't need to filter out any previous flights from the upcoming analysis.
Please clear your blackbox flash memory now.
Step 3.3
Feedforward Slider - Log flights
 Click to enlarge
Now it's time to do some flights.
This time, put your drone in Acro Mode. This is important!
You cannot use angle mode for this, since feedforward is disabled in angle mode.
The idea is to take a flight, then move the feedforward slider a step further up, and repeat until you hit the maximum slider position.
We suggest to move it by 0.2.
Fly for ~20 seconds every time.
Do quick roll and pitch movements (left, right, forward, backward)
Step 3.4
Feedforward Slider - Analysis
Let's run your flight logs through the analyzer and find out which slider values resulted in the best response.
This time we need a different kind of analysis.
This time you can see two lines per flight.
One is called setpoint and the other is called gyro.
The setpoint is essentially the position that the drone should have based on your stick position.
And the gyro is the actual position of the drone measured by the gyroscope.
To tune feedforward, we want that these two lines are as identical as possible. If they are further apart, it means your drone has more delay and feels less snappy.
Be aware:
The plot includes a third line "feedforward", this shows how much feedforward is working, just ignore it.
Upload your "btfl_all.bbl" file into the analyzer (big button below) and compare the flights (you can toggle visibility of each flight line in the plot by clicking its label in the legend on top of the plot)
Find the flight that is closest to the desired state.
Set your feedforward Slider to the value which was used during that flight and hit save (you can find the value in the legend/label of the plot)
You successfully tuned your feedforward.
You can easily zoom into the plot by clicking on the icon on the top right that looks like a square with a plus on the top left corner and then selecting an area of interest in the plot.
In order to use the Tuning Tools Analyzer, you need to download and cache the actual analyzer. The files are about 150 MB in size, if you are currently on a limited data plan, please be aware of this.
Step 4.1
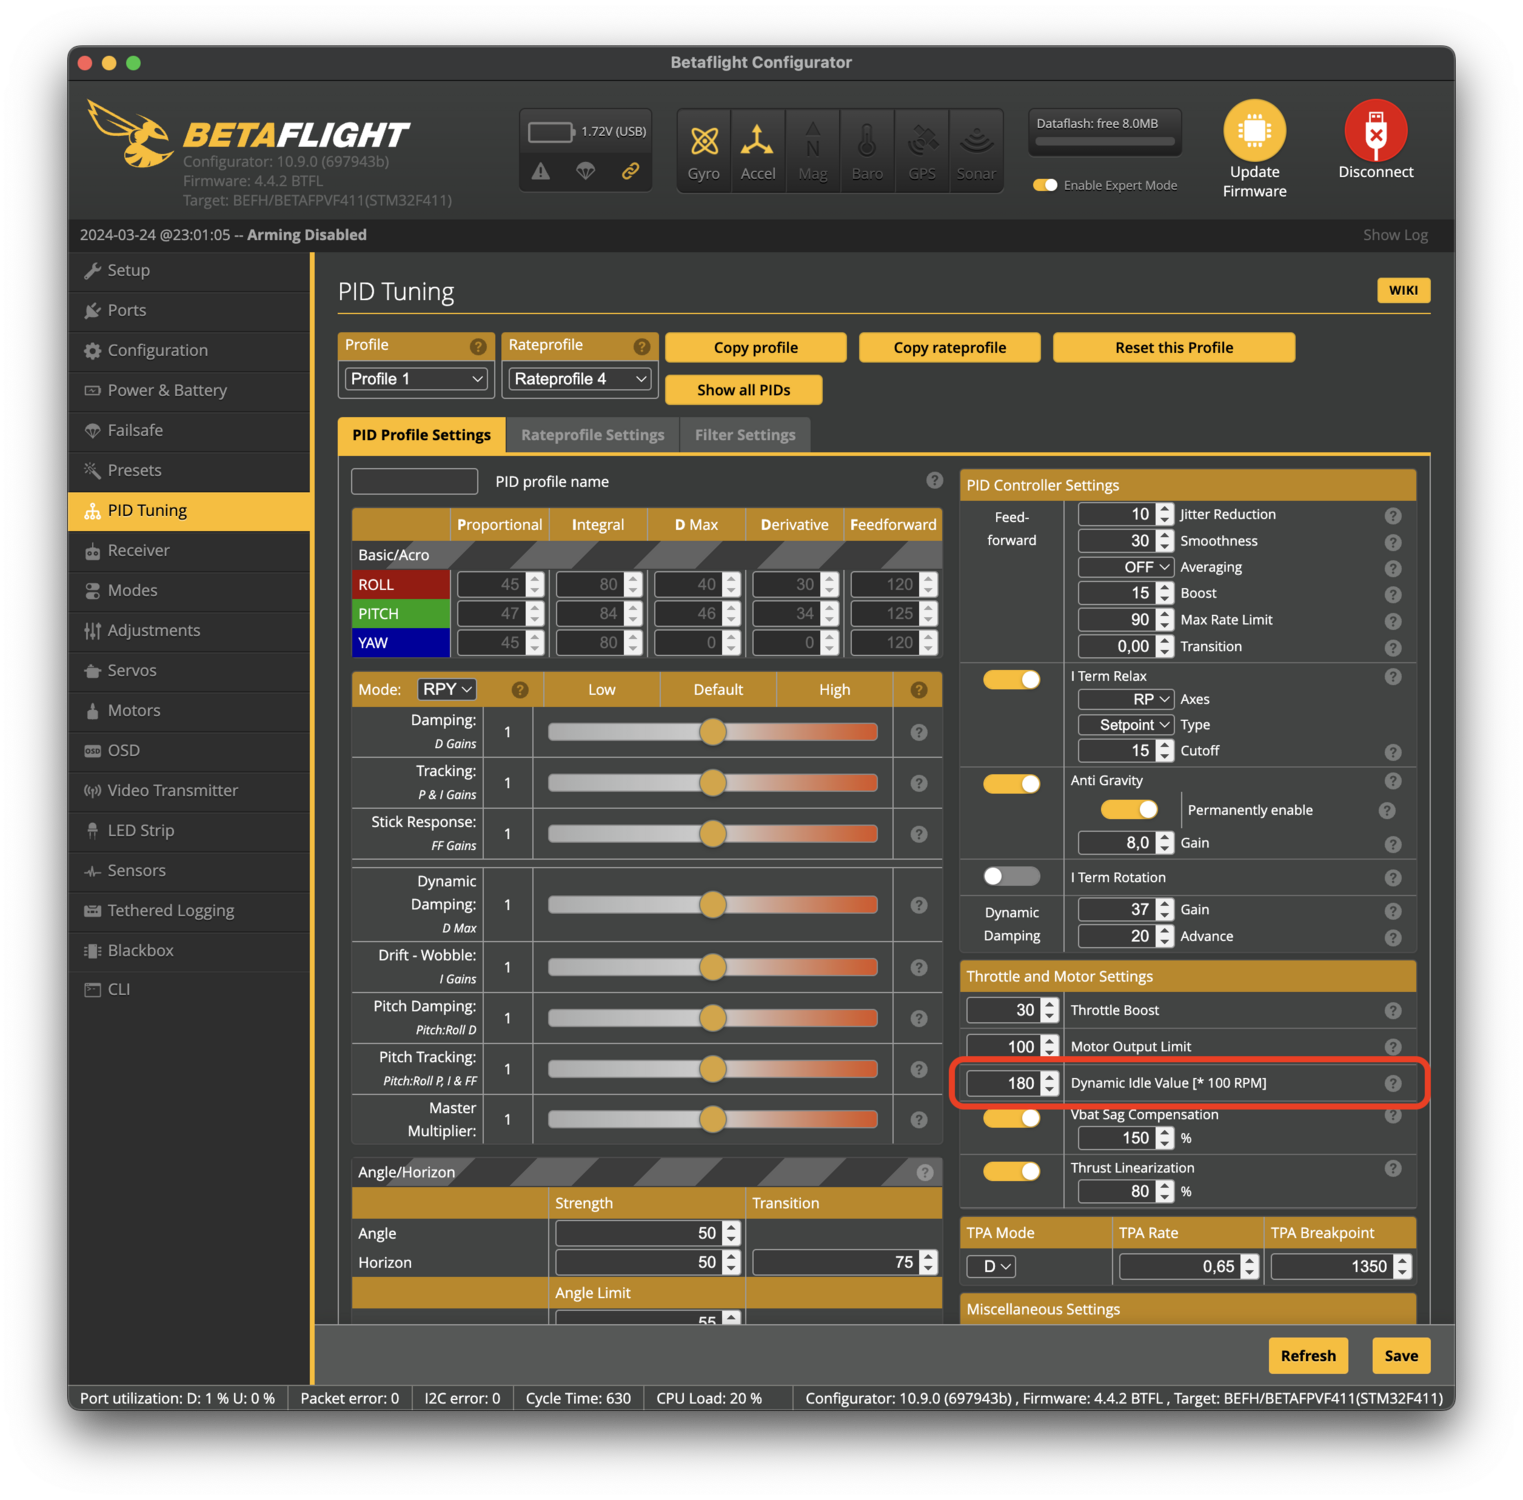
Dynamic Idle
 Click to enlarge
Now we need to set your Dynamic Idle.
This is really simple, just enter your prop size (in inches) into the corresponding field and our calculator will calculate the needed Dynamic Idle value which you can then save into the Dynamic Idle field in Betaflight (see the attached picture)